Finally getting around to posting about my installation of the Rixen/Espar hydronic system. Slideshow with some pics and commentary is below. Shout out to @nealcallan for providing valuable guidance. Points to note concerning the installation:
- The Rixen system offers heat via 1) the Espar furnace (gasoline), 2) the ComfortHot expansion tank with heating element (electric), and 3) your Transit coolant line. You can install any combination of the three; I chose to do all three.
- If you decide to tie into the engine coolant line, ordering the Auxiliary Heater Prep package makes it super easy. There is a stub out next to the drive shaft just behind the front wheel well.
- The stub out is “U” shaped and the rear-most leg (with purple marking) is the hot side and the other is the cold side. The Ford coolant lines are 5/8” whereas the remainder of the Rixen system uses ¾” coolant lines and fittings. I purchased some 5/8” fittings from McMaster for the heat exchanger and two 5/8” Gates 90 degree hoses from Amazon for the engine loop connection.
- I mounted the engine loop heat exchanger to the frame below the driver seat. I made an intermediate mounting bracket out of aluminum and covered it with Teflon tape to avoid galvanic corrosion with the stainless heat exchanger.
- I purposely kept the engine loop heat exchanger close to the stub out, since the BEMM specifies that you should not significantly add to the volume of their coolant loop. I confirmed with Rixen that their pump could handle the distance from the pump in the rear to heat exchanger in the front.
- I copied @nealcallan and installed the Espar furnace under the C pillar, passenger side. Once again, made an intermediate mounting bracket since mounting holes of the Rixen bracket extended beyond the bottom C pillar. Again covered bracket with Teflon tape.
- Continuing to copy @nealcallan, I penetrated the rocker panel walls on the exterior of the van, and the floor of the inner wall cavity of the interior of the van. Thereby avoiding a hole in the main floor which would interfere with other stuff. Surprisingly easy to route Gates hose in the rocker panel area. Used grommets from McMaster.
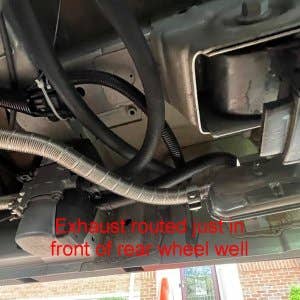
- Fabricated sort of a “C” bracket out of aluminum for mounting the muffler to the rocker panel.
- I mounted the fuel pump to the frame just behind the fuel tank. For now I connected the pump to the Ford auxiliary fuel port which only involved lowering the fuel tank. Eventually I will fully drop the tank and install a smaller pipe as others have documented (I think @gregoryx).
- I mounted the interior gear above the front of the passenger rear wheel well (below the foot of our bed). Had to make a small mounting bracket for the mixing valve (temporarily out of plywood; may eventually make one out of stainless or aluminum). Also made some spacer blocks behind the ComfortHot so it would line up nicely with the pump.
- For now, no duct work attached to air handler; plan is to box out a duct along floor from side-to-side with thin linear register.
- Was able to get it started up without too much difficulty. Initially was not getting enough fuel and it turned out I pinched the fuel line when raising the tank, so needed to reposition slightly. Other than that, worked like a charm.
- Have not used extensively, but so far seems to work great. Camped in it a few nights in the Spring when heat was required. It worked flawlessly and cranked out the heat.
- The ComfortHot tank and heat exchanger get blazing hot. No problem when heat is desired, but counterproductive when you need cooling. Have just recently connected water lines, so have not used for hot water during summer (other than testing). Definitely will act as a radiator but should not be insurmountable.
- Rixen really does a nice job with their system, and it includes almost everything you need. For sure you have to purchase the Gates heater hose. I ended up needing to purchase a couple of extra ¾” hose fittings and some additional hose clamps, in addition to the 5/8” stuff I needed for the Ford tie-in.
- It's a pricey system, but everything works very well and the support from Rixen is outstanding.