Ford Transit USA Forum banner
81 - 100 of 101 Posts
How was routing through the rocker panels for the hose? It feels like the most reasonable place to route the hose, but also seems like it'd be a total bear to make the bend and (blindly) route it through the holes. Did you fish it through, or am I overestimating how difficult that route will be?

@CincyBearcats , I am SO happy you finally received your van after waiting so long. You truly have the patience of Job!

Below are four pictures of the intermediate bracket I used. I don’t believe @nealcallan used an intermediate bracket but I’m sure he will reply once he sees your post. Normally, I would have installed four rivnuts in the frame and not needed an intermediate bracket, but I couldn’t get it positioned the way I wanted. I don’t recall the specifics, but I guess it was due to my desired vertical mount position.
  • The first picture shows most of the hardware components and countsink machining for the flathead bolts. I think the only items not shown are three rivnuts, lockwashers, and two locknuts for the lower flathead bolts. It also shows the extra hole in the middle area of the Espar bracket that I had to drill (described below).
  • The second picture shows what the side of the intermediate bracket that faces the van frame looks like with bolts attached. As you can see, the countersink side of the intermediate bracket faces the frame.
  • The third picture shows the pre-installation of intermediate and Espar bracket. You first insert the middle round head bolt into the intermediate bracket since you can’t do it later. This will eventually go into a rivnut in the frame. A small access hole is drilled into the Espar bracket simply so that you can tighten it with a hex wrench later. Next the two lower flathead bolts must be attached with locknuts prior to installation on the frame, since there isn’t enough room to tighten them later.
  • The fourth picture shows the bracket assembly mounted to the van. Of course the three rivnuts have to be installed first. Next you mount and tighten the pre-installed middle bolt using a hex key through the access hole as described above. And last the two upper bolts are able to go through both the intermediate and Espar brackets and into the rivnuts in the frame.
Concerning the glycol hoses, I’ve attached a couple of pictures that hopefully you can correlate to your van.
  • I don’t recall the leaf spring interfering, but it’s possible I used a right angle drill.
  • Indeed, I don’t believe the lower holes line up vertically with the upper holes. Perhaps it was partially due to leaf spring interference, but I think more importantly the bend radius would be too tight and you might need to use an elbow. By having the lower holes offset to the left, there is enough room to bend the hose 90 degrees up without kinking.
  • According to my records, I used both a 1-3/8” grommet and 1-1/2” grommet for the installation. The ID of the 1-3/8 is 1”, which matches the Gates hose OD and gives a nice tight seal. I believe I used those for the upper holes in the wall cavity. I used the 1-1/2” on the lower holes since the hose went in at somewhat of an angle and therefore required a little extra room.
View attachment 214304

View attachment 214305

View attachment 214306

View attachment 214307

View attachment 214308

View attachment 214309
 
Great thread on these circulation heaters.

Has anyone done any measurements or estimates of how much electricity is used ?

I am toying with the idea of using one in a truck, including keeping the engine warm in the winter.

Thanks
 
Discussion starter · #83 ·
How was routing through the rocker panels for the hose? It feels like the most reasonable place to route the hose, but also seems like it'd be a total bear to make the bend and (blindly) route it through the holes. Did you fish it through, or am I overestimating how difficult that route will be?
It's been a while, but it was definitely drama-free. I recall it was surprisingly easy to route them through the rocker panels. I don't think I needed to fish them through. The grommets are pretty thick, so the hole sizes are fairly large and give you room to position the hose from one hole and grab the hose from the other.
 
The heating element in ComfortHot is 1500 W if you plan to use that as the heat source. Otherwise, if you use gasoline, the furnace and the pump, if memory serves me well, were each rated at drawing in the ballpark of 20-something watts, plus or minus some small margin depending on the pattern of usage, so very modest, and on par with other things, like Peplink and the like.
 
How was routing through the rocker panels for the hose? It feels like the most reasonable place to route the hose, but also seems like it'd be a total bear to make the bend and (blindly) route it through the holes. Did you fish it through, or am I overestimating how difficult that route will be?
We followed the route-through-the-rocker-panels method successfully:

Drilled pilot holes and enlarged with a step bit in order to fit the grommets, deburred, painted the edges. Used a metallic electrical fish tape in the opposite direction, then pushed the hose onto the fish tape to get it to follow the desired route, with a little poking and prodding the hoses came out just fine. The hardest part was pushing the grommets into their final place when we were 1/16" dia too narrow on a couple of the holes. Did need two people.
 
How was routing through the rocker panels for the hose? It feels like the most reasonable place to route the hose, but also seems like it'd be a total bear to make the bend and (blindly) route it through the holes. Did you fish it through, or am I overestimating how difficult that route will be?
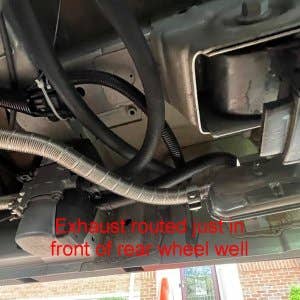
I opted to use bulkheads fittings and go through the floor just before the rear wheel well. I've not finished the install but above these fittings is where I'm going to locate the comfort heat tank..
Image


under the van looking up
Image
 
I went very easy on my tube routing. Right up from the furnace and thru the floor. You can see the tubes on the right in the second pic coming up thru the floor. We have used it about 10 different times now and it has worked great.
As for power consumption, it does require two 20amp 12v connections to run it but it does not pull that much power.I cannot even remember seeing any large amount of power used when we ran it all night long with outside temps in the 20’s.

Image


Image
 
Great thread on these circulation heaters.

Has anyone done any measurements or estimates of how much electricity is used ?

I am toying with the idea of using one in a truck, including keeping the engine warm in the winter.

Thanks
Power draw is shown below my van's idle draw during this time was 100 watts. when the heater turns on it consumes about 160 watts for about 2 minutes. After ignition averages around 50 watts. Then you can see during the shutdown sequence it peaks 160 watts again for about a minute. My rixen setup is with floor heating so that is 2 pumps running and a fan. I don't know idle consumption of just the heater system itself.

I also went with bulkhead fittings like @mototreks

I have over 300 hours of run-time on mine with the only issue i had was self inflicted by voltage issues with dc-dc converter.

Image
 
Fantastic info - thanks everyone.

On the air heater systems, there are often issues with applications that have elevation changes.

In this area, a common trip is going from more or less sea level, to Lake Tahoe / ski areas, which can get close to 3000 meters.

Is there any indication that these are less sensitive to elevation changes than the air heaters ?

Thanks
 
Talking with Jim Rixen he has not experienced any altitude issues with the hydronic furnace systems. Or nearly as much sensitivity about the diameter of the pickup line going into the ford tank (though I put in the similar small diameter “straw” as other folks do for their air heaters here.

also sounds like the Velit air heaters are less sensitive/fussy in forum discussions here, at a lot less cost than a Rixens system. But then you’ll need a water heater.
 
Another question regarding the minimum temperature that these can be set to run at.

Part of the driving force for this is to keep Li batteries up to ~ 40 F / 5 C, as well as water, etc.

Any idea what the minimum temperature setting is for the rixen and others ?

I might just set it up to run all of the time to keep things from going below freezing / LiFe shut down temps.

Thanks
I can set the Rixen's MCS7 thermostat to 37Âş F
 
Thank you.

Does the circulating coolant temp go up and down with that setting, or just the air temperature setting ?
I'm unsure your exact question but I can explain more of how the rixen system works as well as ideas for what i think you're wanting if I'm not just a dummy and reading this wrong (70% the case).

the setting you adjust will be for air temp if it gets below that the heater will start to warm the coolant. The coolant temp ranges from ambient to 165 F @ 165 the furnace shuts off and just circulates the coolant to continue to warm the area. Idk the temp the furnace turns back on at as I've never paid attention to but now I want to find out and I will hopefully get back to you soon with that info. But it will continue this cycle until the desired air temp is met.

there is a "signal" for constant heat that turns on the heater for hot water.

with canbus you do have more control on what it does in an external way albeit unconventional. If you're wanting to keep the coolant at a set temp consistently what "I" would do was have a little code monitoring coolant inlet temp if that temp drops below x then call "constant heat". that will start the heater no matter the air temperature warm the coolant.

sorry if this isn't what your looking or asking for
 
Another question regarding the minimum temperature that these can be set to run at.

Part of the driving force for this is to keep Li batteries up to ~ 40 F / 5 C, as well as water, etc.

Any idea what the minimum temperature setting is for the rixen and others ?

I might just set it up to run all of the time to keep things from going below freezing / LiFe shut down temps.

Thanks
My Lithium batteries have internal heating pads, but I still keep the van above freezing to avoid plumbing issues related to water in the lines. Rixens have a newer thermostat now, so I can not say what the minimum is, but I keep my van at 40 F to know the lines in that back corner that don't get much airflow will be OK.
 
I'm unsure your exact question but I can explain more of how the rixen system works as well as ideas for what i think you're wanting if I'm not just a dummy and reading this wrong (70% the case).

the setting you adjust will be for air temp if it gets below that the heater will start to warm the coolant. The coolant temp ranges from ambient to 165 F @ 165 the furnace shuts off and just circulates the coolant to continue to warm the area. Idk the temp the furnace turns back on at as I've never paid attention to but now I want to find out and I will hopefully get back to you soon with that info. But it will continue this cycle until the desired air temp is met.

there is a "signal" for constant heat that turns on the heater for hot water.

with canbus you do have more control on what it does in an external way albeit unconventional. If you're wanting to keep the coolant at a set temp consistently what "I" would do was have a little code monitoring coolant inlet temp if that temp drops below x then call "constant heat". that will start the heater no matter the air temperature warm the coolant.

sorry if this isn't what your looking or asking for
Thanks - I am still in learning mode / what is possible vs my dreaming.
 
Thanks - I am still in learning mode / what is possible vs my dreaming.
Good questions—you shouldn't have to overthink it too too much. It's a fairly standard thermostat approach in most ways, so if you make the set point 40°F to protect your water or batteries, the Rixen's system will manage the call for heat to maintain your set point. The furnace, upon receiving a call for heat, manages the glycol temp, holding it between 165°F and 185°F (I think). I made a canbus controller for the MCS7 that allowed for a bit more niceties with thermostat presets and I have a preset called "Freeze Protection" which sets the thermostat to 40°F and turns the fan OFF, so we'll just get radiant floor heat. The thing to keep in mind here is where you're sampling ambient air temp. Your water or batteries could be separated enough or touching metal near the exterior of the vehicle. Another benefit of taking over control of the MCS7 is that I am using multiple temp sensors and averaging them together for a better sense of temps.

If you do have the floor loop option that is considered the primary heat source and will be used to radiantly heat the floor and materials that touch it—like water tanks and batteries! The air blower is then considered supplemental (or 2nd stage) heat to make up what the radiant heat can't. The MCS7 has a delta temp setting for the air blowers, so it won't use the air blowers unless the delta between ambient and set point is greater than that number. So you have a few degrees C delta there which means it's radiant floor heat only for much of the time. Our air blower is really only used in SUPER cold temps (like below freezing) and maybe if the door is open for a bit and the ambient temp drops quickly. But we rarely hear the air blower on, and if we do, only on low. Highly recommend the floor option if it's doable for you.
Thanks - very helpful info.

That is the difference in goals for me - I don't want the glycol to be that hot when it is just for freeze protection.

I am hoping to run it to a trailer when it is connected to the vehicle, and those temperatures would be too dangerous for that use, as well as some other uses.

My goal would be glycol / coolant temperatures more like 20 - 30 F above the air temp setpoint.
 
81 - 100 of 101 Posts