First time poster. Long time reader. I'm converting a 2020 transit 148 WB HR EB. And right off the bat, I had an heart dropping mess up so now I'm dropping my pride and reaching out for help.
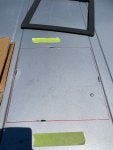
I cut the metal hole for the Maxxair fan 1/16 of an inch too small. At the time I only had a jig. So I tried to shave off the metal with the jig...and the photo below is what happened. Yes, I had a metal blade with 32 teeth. It looks like a kindergartener had some fun with power tools. What the photo doesn't do justice is how WARPED and bent the metal is along that line now. I stopped and hoped everything would be fine with enough butyl tape and lap sealant because I was only making it worse with the jig.
Because of the warped metal, Hein's adapter wasn't flush, and because of this, the 4200 marine adhesive didn't bond the adapter to the roof. I still went on ahead. Butyl'ed the flange to the adapter and screwed everything to a wood frame on the inside I made out of 2x2s. (I was vigilant about metal shavings, cleaning with alcohol, pilot holes, etc). Then A LOT of lap sealant.
Now I have a leak - dripping in one spot towards the warped metal. My fear is that because of how warped and messed up that metal is, I will ALWAYS deal with leaking. I think I should take it all apart and start all over again by smoothing out the metal with a grinder I now own, but I fear I will make it worse or start making the hole too big. And I would possibly have to drill more pilot holes adding to more spots for risk of leaking?
What should I do? Any helpful tips would be appreciated. (side note - the dome fan and all my windows went in well with no leaks and no kindergarten metal cuts so I learned?)
Thank you in advance for the help, Transit community.