Ford Transit USA Forum banner

Stereo Upgrade

23K views 72 replies 13 participants last post by  thudd3r  
#1 ·
Finally getting around to installing the small stack of audio components sitting in the garage.

will be installing:

DSP - AudioControl DM-608
Amp - AudioContro LC-5.1300 w/ACR-1
Sub - Kenwood WR-W1202
Front Speakers - Kicker 47Kss6704
Rear Speakers - Kicker KSC6704
Harness - PlugNPlay Kits
Misc SMD bits for fusing and connections

I built the sub enclosure a couple of weeks ago. it will sit between the back of the second row seat and the front of the decked drawer system on the drivers side against the wall. tried getting it under the 2nd row seat but just couldnt get the volume i needed and still have room for excursion.

the enclosure extends under the seat and provides space for the AMP/DSP/connections/etc.

Image


Image
 
#2 ·
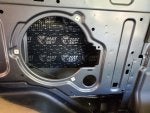
Today i installed the front and rear speakers. no pics of the rear...they are a direct replacement using the rings and wiring adapters from crutchfield. i use sound deadener inside each door and also used fast rings with the encluded horn pad attached to the door.

For the fronts i had to run the extra wires for the new tweeters. i sourced the oem style terminals and built cables from 14ga wire (the terminals are also 14ga) to connect like the rest of the oem harness in the door jam using the emply spots in the connectors.
Image


they are available on amazon...you will need the appropriate sized terminal crimpers as well

Image
 
#3 ·
here is the passenger side harness with the pins inserted, just like oem. there are 2 empyt spots right nest to each other/ just slide your terminals through the comb and into the connector same for the female plug (make sure to use the same 2 spots)
Image


Image


same for the female plug (make sure to use the same 2 spots)
Image


Image


the drivers side is the same except the two avaiable spots were not next to each other. they were actually in different plugs (one in each). i would guess this may vary based on the options your van has
 
#4 · (Edited)
here are the tweeters installed. my treeters were about 1.5mm larger than the oem ones. popped out the oem tweeters, used a dremel to sand down a couple of ridges in the mount and the kicker tweeters went in with a little force...enough that they arent coming out. a could of the latches even latched the tweeter in place just like the oem ones.
Image


i have read the trim is really hard to remove on the drivers side...not sure if they did something different with the 2030...but they came out and went in easy

Installed sound deadener in the doors and the horn pads. Rest of the front speaker install was pretty standard...mount the crossover (great of ford to provide a nice open space near the top of the door where the armrest is molded into the door panel} and connect from the oem input to the crossover (using the crutchfield adapter) and connect crossover output the tweeters (using the newly run wire) and mids
Image


next weekend i will mount up the sub and amp...then tune it
 
#10 ·
here are the tweeters installed. my treeters were about 1.5.. larger than the oem ones. popped out the oem tweeters, used a dremel to sand down a couple of ridges in the mount and the kicker tweeters went in with a little force...enough that they arent coming out. a could of the latches even latched the tweeter in place just like the oem ones.
View attachment 190952

i have read the trim is really hard to remove on the drivers side...not sure if they did something different with the 2030...but they came out and went in easy

Installed sound deadener in the doors and the horn pads. Rest of the front speaker install was pretty standard...mount the crossover (great of ford to provide a nice open space near the top of the door where the armrest is molded into the door panel} and connect from the oem input to the crossover (using the crutchfield adapter) and connect crossover output the tweeters (using the newly run wire) and mids
View attachment 190953

next weekend i will mount up the sub and amp...then tune it
I had no issues installing tweeters and speakers in my 2018. In fact i just removed them as I got my 2023 last week.

The 2018 is a company van and had the most basic POS radio you can imagine. I am suprised it had FM. So I ordered a Kenwood stereo and brackets and had very little difficulty installing.

The one thing that really, really pissed me off with the Kenwood is that it was very hard to see on a sunny day.
 
#9 ·
Up until now we only had Joefromga's how-to, I will put it here because it tells how to take the front door panels apart.

 
#11 ·
had a couple of thoughts i wanted to add.

first, i attached the crutchfield install notes for anyone looking for instructions on installing a head unit or speakers. the notes say through 2020, but i found them to be correct for a 2023 with one minor difference. two of the screws for the front door panels do not have the little covers anymore. they are the forward screw and the one in the map pocket. other than that they are correct for the doors (will verify the notes for the head unit next weekend when i run the new wiring).

the other note i wanted to add has to do with the door panel removal. i found that instead of trying to get the door cable (for the handle) disconnected (which can be a pain in most cars), i simply removed the door handle assembly from the door panel and fed it back through the hole. once the screw is removed it comes out pretty easy...better than fishing for the cable connector and trying to disconnect it
 

Attachments

#12 · (Edited)
another day and a bit pf progress...between thunderstorms and errands i didn't get as much done as i had hoped to...but good progress anyways

first to tear apart the dash. i really didnt have to remove much to get to the necessary plug.

first remove the screen and the dash surround...the instructions above were pretty close. get the screen off was consistent with the instructions (remove cover and 3 screws), but the wo screws holding the black module (apim i think) were in a different location than the instructions (middle of picture, screws alreasy removed). .
Image

here is the center console piece, a bit different that the instructions but that is a smaller screen
Image

module removed (2 plugs)
Image


the plug that connects to the plugnplay kits harness is behind the square black frame...4 bolts to remove (instructions differ here). need the black plug on the right
Image

the harness...
Image

installed
Image
 
#13 · (Edited)
all back together with the harness plug (white on the left)
Image

now for the fun part...get the long portion of the plugnplay kits harness and run it how you want to go to your amp and sub. i am going right down the middle. feed the white plug under the carpet/vinyl and up through the console. i took the drivers side of the center console apart to feed the cable up through to the stereo. here it is sticking out. this is probably the hardest part of the install
Image


here is the other end running down the center of the van (cover/trim and plastic 'tunnel cover" removed)
Image
 
#14 ·
along with the harness i also ran an rj45 cable for the acr1 bass knob for the amp. fabbed up a small plate outr of black polycarb and used vhb tape to mount it. cable goes through a small hole in the back of the plastic "cubby" in the center console. had to remove all of the cover and mount to get it to fit in this small spot.
Image


Image


Image


Image

probably remake this with a thinner piece of polycarb
Image

so all that is left is installing the sub/amp/dsp enclosure and running the cables under the floor in front of the back seat

oh...and tuning
 
#15 ·
finally have everything installed...

final mockup/placing...the ox extends under the seat along the wall
Image


cables run (behind the drivers seat)
Image


here you can see the cables coming through the floor. fortunately, there is a channel in the foam that allowed me to run the signal cables right along the seat brackets. and up into the bottom of the box.
Image


fuse holder placement (since i will be limiting this run to 120amp and the CCP2 is 175amp). not the best place, but there really isnt a good place to put it.
Image


the power cables run along the side against the wall, under the panel. i used the extra tie down point for the ground and ran the positive to the fuse block behind the panel and up through the trim. just enough room for 4ag wire
Image


final resting place...
Image


tuning tomorrow
 
#16 · (Edited)
k...been awhile as i have been dealing with alot of issues on this install. after getting everything installed and setting the gains on the amp i went to tuning the dsp. the dsp gives you complete control over the incoming and outgoing signals, crossover points, gain on incoming/outgoing signals/ability to sum and split channels, and eq the outgoing signal to overcome any oem inputs meant to save the low power oem speakers (bass rolloff), etc.

keep in mind this is on my 2023 with the 6 speaker system and the sync 4 stereo, with the larger display

what i learned for this head unit/system (hopefully save someone else some headaches)...

1. each speaker gets the full signal, no crossovers in place. the only crossover is through the tweeter in the pillar, and that is done with a resistor. the front and rear pair of speakers get the exact same signal, the rears may be a couple db lower

2. no noticeable (or at least very minor) bass rolloff at higher volumes

3. no other tweaks to the signals, no delays - sound appears to be output at the same time from all speakers

4. the stock head unit starts clipping at ~25 out of a max of 30 on the dial using a pink noise test track at 0db gain. the dsp has a light to indicate clipping and with aftermarket speakers the clipping is very noticeable. a 40hz tome will have the clipping occurring at 19 or 20, but that isnt very realistic since music wont drive that kind of load

4. with "normal mp3s" or bass heavy music the head unit starts clipping ~21.

6. setting amp gains...unplug all outputs from the amp!! either use an o scope or get an amp with clipping indicators (much easier). set your amp gain with the vol at 25 and any bass knob maxed. oem "eq" in the middle. you could max the bass here when setting gains, which would keep you from possibly clipping if you max the tone setting (but you lose some adjustability). with gains set at 25, keep your volume below 20/21 to avoid clipping with music recorded at higher volumes

with everything tuned and nothing clipping or near maxed, i started having issues. keep in mind this is with 0db of gain in the dsp input, and -3db on the output (yea lowered output even):

-different speakers would drop out at random volumes. right rear popped and dropped and never came back on. thought it was bad/blown even though i was well under its rms of 100w
-front drivers side did the same...tweeter first then mid in the door
-starting the van in the morning all would work for a short time then start acting up within 10 min of moderate playing
-when speakers would come back on, they hissed/popped/etc like they were blown
-sub would only work half of the time
-would get thumping/popping when unlocking the van
-took forever for the amp/dsp to turn off when shutting the van down/exiting. i used the signal sensing on the dsp to turn everything on/off but it took wouldnt shut off until the ccp2 (my power source) would time out
- even with the audio off, had a noticeable hissing noise

next post...
 
#17 · (Edited)
i originally planned to go straight into the amp, but added the dsp at the last minute out of a fear that the oem system tweaked the signal and i would need the adjustability.

first i replaced the rear speakers thinking they were blown...they werent...new speakers same issues but the side that acted "blown" switched

since the signal was coming into the dsp, but nothing out, i took the dsp out of the equation and connected directly to the amp as originally planned. reset the gains and played the test tracks...amazingly all the issues went away

now my dsp may be bad (it is going back to crutchfield) or the beta audiocontrol sw might be bad (it is clunky to begin with), but my findings below are based on the system performance without the dsp.

1. i am sure someone is going to disagree, but you dont need a dsp with the sync 4 system in a 2023 van. save your money. there is no negative adjustments to the signal that need to be corrected. pick an amp with the necessary features and that is all you will need to integrate with the oem stereo.

2. without a dsp your tuning is limited to the amp gains and the tone settings, but i found that to be enough. the delays may be a bit off (they may all be the same regardless of position), or maybe the oem head unit is taking care of it. after tweaking everything through the dsp i barely had any adjustments (those settings i did make were duplicated on the the amp except delay), so with the available oem settings i got the sound to the output i like

3. dont use the "driver only" setting under occupancy because it just sucks, use "all positions"

4. make sure your amp has the necessary features to connect to an oem system and you likely wont need a dsp (i have an audiocontrol lc5.1300):

  • separate crossover settings for each channel/channel pair
  • speaker level inputs
  • signal sensing turn on so you dont need a separate switchable power signal
  • accubass or other bass restore technology in case you find bass roll-off (again i dont see it when looking at the signal. even if there is some roll-off of the lower frequencies your mid crossover point will be above that, so you would only need it for your sub anyway. i added some to increase the volume of the sub at lower volumes
  • i would suggest an amp with input and output clipping indicators just for the ease of setup, but not essential
 
#18 ·
final thoughts

try it without a dsp first...you probably wont need it unless building a monster system or adding more speakers than the system is outputting and need to map the oem inputs to multiple outputs or vice versa (signal summing)

my harness from plug n play kits is worth the money. it came with lcd (load control devices) from audio control that are meant to correct issues with the speakers being turned off by the head unit when it senses a lower load. the head unit thinks the speaker is disconnected or blown because the resistance of the aftermarket speaker is lower, so it shuts off the output to that speaker. i dont believe the oem system has this feature or the speakers i am using (still 4 ohm like stock) have the necessary resistance. anyways i tried it with and without the lcds and had no noticeable difference...so only add them afterwards if you run into issues

i think i will replace the front components because the mids sound "muddy". they were a cheaper set of kickers and my expectations are probably a bit too high for the price.

i will let you know what i find out about the dsp
 
#19 ·
minor update...

rear speakers were replaced with kenwood KFC-1796PS 6 3/4 coax when i thought one of the kickers died. they definintely sounded better, getting rid of the "muddy" mids of the kickers.

replaced the front kicker components with morel maximo ultra 602 mkii. like night and day in comparison to the kicker components...but at 2x the price. considering how dependent we are on the fronts in these vans (the rears are really just "fillers") i would suggest spending the extra money on a nice set of components up front. while anything is an upgrade over stock, nice components really fill the cab of the van and have that "sparkle" of good clean highs. added mid bass from the quality woofer helps too.

next is to put a second set of the kenwood KFC-1796PS in the c pillars. will switch up the harness to run them in parallel since my amp can supply the necessary 200w @ 2ohm
 
#21 · (Edited)
yea it is definitely not a great way to save money. i usually do a modest system in every one of my vehicles and dont go overboard...already thinking a second sub would be nice with all this room to fill :unsure:

i thin a good compromise for someone wanting a good improvement over stock would be a powered sub under the passenger seat or under the second row (on a crew), combined with a nice set of components up front. that way you get decent mid bass (without pushing them to produce the lows) and a small sub to add in the lows. wont shake the walls, but will fill the cab with clean highs/mids/lows
 
#22 ·
Thanks for the write up. I am just starting my research into upgrading my audio. I have the 12" sync 4 but only have 4 speakers I'm pretty sure.

I have two 12" JL competition subwoofers in a small ported box with amp that I would love to use in the van somewhere. Any ideas? I'm trying to save space if possible.

Any updates with how your system is doing?
 
#23 ·
a pair of 12s are going to need about a cubic ft (each...assuming sealed box), which means you will need some room for the box. probably 14" x14" x 12" or so for each sub.

which van do you have? cargo? crew? passenger?

i was able to get close to 1 cu ft. of volume with a box under the second row of seating in my van, but couldnt get 2" for excursion...so i built a box to fit behind the row of seats in the dead space between the back of the seat and the front of my decked drawers. it was a small space that really didnt get much use, and the box only took up a small portion of it.

for a passenger van i would go all the way to the back, behind the last row. cargo, maybe a long thin box mounted against the drivers side wall, like in front of the wheel well...that should limit the space required

my system is still doing good. i have ended up putting the accubass all the way up (always on) and the level near the top. van is alot of space to fill with bass. ended up increasing the frequency for the rear speakers in the doors to 90hz to protect them a bit more, and it isnt like the 6.5" is going to put out much mid bass that you will hear from all the way int he back. the morels up front really shine and provide 75% (warning bs statistic) of the sound, so that is where to spend your money
 
#24 ·
I have a cargo van that I’m converting to a camper.

I am definitely going to have to remove the subs from their current box because space is a huge premium for me. I just can’t bring mtake a loss by selling them and buying something new haha.

I might just have to upgrade the stock speakers for now. Also, I don’t have rear speakers but I agree with what you said about them.

What should I look for when replacing the front speakers?
 
#25 ·
a good set of components where the rms matches the amp you will be using. what is the output per channel of the amp? they will be providing all of your tweeter and mid bass, so i would suggest something with a higher power rating (75-100w) assuming your amp can supply that much power...especially since they are the only thing matched up to those two subs

this build is the first time i have used morels and i am pretty much sold on them. speakers are like oil though...everyone has a favorite

make sure to get fast rings to help get as much mid bass as possible out of the fronts. also bet some sound deadener for the inside of the doors and the wall close to the subs. the large panels of the transit will vibrate from the bass and the sound deadener will help
 
#26 ·
This is what my amp is. JL Audio JX1000/1

I thought it was a little bigger. Not sure if I want to reuse it yet because I haven't had time to look into it.

This is just the amp that I currently have for my 2x 12" subwoofers.

I do have sound deadener already for whenever I decide to change out the speakers.

Do you find that crutchfield is up to date on the latest Ford sync4 upgrade paths?
 
#27 ·
crutchfield didnt have much for the ford sync 4. would expect that metra or iDatalink or another aftermarket company would come up with something for factory integration, but not much as of yet for harnesses (speaker adapters and head unit adapters are avaiable). i went with the harness from plugnplaykits and it worked as advertised

the harness will get you from the oem head unit to your amp/dsp with speaker level inputs. he also included the audiocontrol load generators, which is a nice touch.
 
#28 · (Edited)
another update...got around to adding the second set of rear speakers into the c pillars using the oem locations. pretty easy upgrade...especially if you do it BEFORE you install wall and ceiling panels. for speakers i am using a second set of the kenwood KFC-1796PS 6 3/4 coax (matching the speakers in the back doors)

here is the location with the load panel removed (had previously installed some sound deadener in all the available spaces back when i installed the walls and ceiling panels

Image


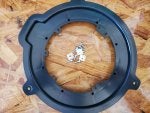
here are the adapters i used. purchased off ebay (Rear Speaker Mount Install Plate Bracket Wire Harness for 2015-2020 Ford Transit | eBay ). $30 and they even give you the mounting screws/inserts and a set of wiring adapters (didnt use the wiring adapters for my install). you will need the screws and plastic inserts if you have never had speakers in these locations

Image


inserts installed

Image


here is the wiring for the rear speakers (thanks to @kazuo )

Image


the harness for the c pillar speaker has them wired in serial with the rears, so the resistance is doubled to 8ohm in this configuration (assuming the oem speakers are 4ohm). in addition to cutting the power in half (lower volume), wiring in serial can also lead to some weird audio effects. wiring in parallel will double the power and sync the speakers. since my amp is rated for 100w@4ohm or 200w@2ohm, and the speakers i am using are 100w@4ohm, wiring in parallel will result in 200w being evenly distributed to the 2 speakers (per channel)

fortunately ford made it easy to add the c- pillar speakers by leaving a loop/passthrough in the wiring harness near the speaker location. you have to unwrap the harness tape from the large plug just past the c-pillar speaker location. here is the loop for the drivers side
Image


if you simply cut the loop the rear speakers will stop working since it is a passthrough. to wire in parallel you simply cut the loop and then twist the pairs back together (+ to + and - to -). then wire your speaker leads to the twisted pairs. since i am wiring in parallel the speaker leads are wired + to + and - to -, unlike the diagram above. both sides are the same but the wire colors are different. once wired and connected to the speakers, check the resistance. if wired in parallel you should see around 2ohm (i had 2.4ohm, which is pretty good considering the cheap wire ford uses, the length of the harness, and the use of connectors)

stick a horn pad to the inside of the van wall behind speaker location and mount the speaker with a fast ring to help with mid bass (sorry...switched sides for this pic)

Image


i cut the holes in my wall panels and used speaker grills off amazon that are flatter than the kenwood grills so they would fit under the top lip of my decked drawer platform
Image


Image


the grills are kinda cheap, but if they ever take a hit from a shifting load they are easy to replace at a minimal cost.

having another set of speakers located closer than the back doors definintely increased the volume. not a groundbreaking change, but definintely noticeable and gets rid of the dead space behind the front seats.
 

Attachments