
I really screwed up and drilled through some wires in my 2019 Transit Cargo. Now my drivers side headlight and passenger side break light doesnt work. What can I do to fix them?! The only thing I can think of is splicing in new wires. Could this work? How would I know which are which? Please help!

Chrisdvr4
I really screwed up and drilled through some wires in my 2019 Transit Cargo. Now my drivers side headlight and passenger side brake light doesn't work
1 reading
Chrisdvr4
Discussion starter
48 posts
·
Joined 2021
- Add to quote Only show this user
I really screwed up and drilled through some wires in my 2019 Transit Cargo. Now my drivers side headlight and passenger side break light doesnt work. What can I do to fix them?! The only thing I can think of is splicing in new wires. Could this work? How would I know which are which? Please help!
342 posts
·
Joined 2020
Have you ever seen the repair process when an underground cable gets severed?
Unfortunately that's you now, albeit on a smaller scale
Pull up a chair, find an accesible point A before the damage, and an accessible point B after the damage and meticulously replace everything in between.
Best wishes and thank you for posting. It will serve as a warning to all of us.
Unfortunately that's you now, albeit on a smaller scale
Pull up a chair, find an accesible point A before the damage, and an accessible point B after the damage and meticulously replace everything in between.
Best wishes and thank you for posting. It will serve as a warning to all of us.
6,395 posts
·
Joined 2016
36 Years ago I knocked a ten foot Ground Rod through the main north/south AT&T copper cable between Florida and the Midwest, It took them three days to fix it. I watched them fix it since I was still working nearby. Back in those days there was no number you could call and ask about such things.
5,216 posts
·
Joined 2015
What is the location of the hole where you drilled through wires?I really screwed up and drilled through some wires in my 2019 Transit Cargo. ...How would I know which are which?
12,816 posts
·
Joined 2016
If you can access the spot, you can solder the wires back together. After untwisting them, of course.
If you can't access the spot, you'll have to pull them out, pull splice wires through, and make your connections.
If you have more money than know-how, you can take it to a shop and have them replace the entire harness for a few thou$and. This isn't needed, of course, but they'll insist.
If you can't access the spot, you'll have to pull them out, pull splice wires through, and make your connections.
If you have more money than know-how, you can take it to a shop and have them replace the entire harness for a few thou$and. This isn't needed, of course, but they'll insist.
134 posts
·
Joined 2018
if you mean the big group of wire near the ceiling, then it s not that complicated. take everything out in that specific area and look at what wire was cut and reconnect them together. it s not overly complicated but you need to take your time as there is up to about 30 small wire all roll-up together. But they all have a different color so it s ''easy''!!!
11,113 posts
·
Joined 2016
Here is the "by the book" method from Ford for splicing connections. If the damage is in an inconvenient place to solder, this way might even be easier than soldering. These recommended splices are crazy expensive. I'd think any decent adhesive filled heat shrink crimp splice would suffice. If the repair is made by soldering, it is best to have some type of strain relief. Piecing in a bit of wire so the repaired section is longer than the rest of the harness might be a good idea. Reconnecting the broken wires so they end up shorter than the others is probably not ideal. Overkill - probably, but I'd want to as much as possible to avoid chasing down electrical gremlins in the future. (On the packaging lines in the plant I worked, I cannot ever recall an technician using a soldering iron on the for wiring connections. There were rare occasions where soldiering was used to repair a circuit board while in place.)
4.2.8 Wiring Splicing Procedures
TYCO-RAYCHEM crimp splices

Ford Motor Company strongly advises against the use of wire splicing due to the variable and unpredictable nature of making robust, durable and reliable connections. However, if it is deemed that a wire splice is absolutely unavoidable, it must be made with DuraSeal Heat-Shrinkable, Environmentally Sealed, Nylon-Insulated Crimp Splices
(manufactured by TYCO-RAYCHEM). For example the D406 series. As a further process to improve the
splice integrity, the splice should be further sealed with a suitable heat shrink tubing.
4.2.8 Wiring Splicing Procedures
TYCO-RAYCHEM crimp splices
Ford Motor Company strongly advises against the use of wire splicing due to the variable and unpredictable nature of making robust, durable and reliable connections. However, if it is deemed that a wire splice is absolutely unavoidable, it must be made with DuraSeal Heat-Shrinkable, Environmentally Sealed, Nylon-Insulated Crimp Splices
(manufactured by TYCO-RAYCHEM). For example the D406 series. As a further process to improve the
splice integrity, the splice should be further sealed with a suitable heat shrink tubing.
2,168 posts
·
Joined 2016
I would first look up inside the wall with a flashlight , particularly near the bottom of that
red line that you drew.
I'm thinking that the wiring harness runs horizontally until it reaches the bottom of
that long red line that you drew , at that point i'm thinking that the harness doesn't go up quite yet but
continues for another 6 inches to the rear of the van and then goes up to behind the rear brake light.
If so the only place you could of drilled into the wiring harness is at the bottom of the
red line that you drew.
Can anyone confirm the routing of the passenger side harness ???
red line that you drew.
I'm thinking that the wiring harness runs horizontally until it reaches the bottom of
that long red line that you drew , at that point i'm thinking that the harness doesn't go up quite yet but
continues for another 6 inches to the rear of the van and then goes up to behind the rear brake light.
If so the only place you could of drilled into the wiring harness is at the bottom of the
red line that you drew.
Can anyone confirm the routing of the passenger side harness ???
Chrisdvr4
Discussion starter
48 posts
·
Joined 2021
I would first look up inside the wall with a flashlight , particularly near the bottom of that
red line that you drew.
I'm thinking that the wiring harness runs horizontally until it reaches the bottom of
that long red line that you drew , at that point i'm thinking that the harness doesn't go up quite yet but
continues for another 6 inches to the rear of the van and then goes up to behind the rear brake light.
If so the only place you could of drilled into the wiring harness is at the bottom of the
red line that you drew.
Can anyone confirm the routing of the passenger side harness ???
I think I need to cut all of these wires (like 25) at each of these locations and splice. I dont know which ones are severed so I think I should do them all. I am so dumb and embarrassed.
2,168 posts
·
Joined 2016
I drew on your picture where I suspect that you drilled into the harness.
You would need to remove your lower wall panel and look up in there with a flashlight.

You would need to remove your lower wall panel and look up in there with a flashlight.
1,518 posts
·
Joined 2020
If it was me, I would pull the whole wire harness out and only fix the wires that were cut. Once you start cutting the whole wire harness in half it is easy to make a mistake and not get it spliced back correct.
1,518 posts
·
Joined 2020
The hardest part is the passenger rear corner. There is a connector behind there.
Instead of pulling it, fix one wire at a time if possible. Start with the worst damage first. Then check function.
Once everything works, the other wires with small nicks in the insulation, you could probably just tape or put some of that brush on rubber insulation.
Instead of pulling it, fix one wire at a time if possible. Start with the worst damage first. Then check function.
Once everything works, the other wires with small nicks in the insulation, you could probably just tape or put some of that brush on rubber insulation.
Chrisdvr4
Discussion starter
48 posts
·
Joined 2021
Do you happen to know the wires sizes?The hardest part is the passenger rear corner. There is a connector behind there.
Instead of pulling it, fix one wire at a time if possible. Start with the worst damage first. Then check function.
Once everything works, the other wires with small nicks in the insulation, you could probably just tape or put some of that brush on rubber insulation.
12,816 posts
·
Joined 2016
IF IT WERE ME; I'd only fix what's broke, and I'd do it by splicing same or larger gauge (not much) wire if the cut ends cannot be reconnected and soldered. I wouldn't pull the whole harness out. I would guess that unless the wires are more than half severed, that if there is still connection from one side to the other, a dab of solder and insulating will do the trick. Several wraps of elec tape. Everything is color-coded, so it would be hard to wire together different wires, unless you're colorblind or drunk.
I also suspect if the wires aren't completely severed, that something grounded out, blowing a fuse or two. Don't replace the fuses until the wiring is done.
I also suspect if the wires aren't completely severed, that something grounded out, blowing a fuse or two. Don't replace the fuses until the wiring is done.
Chrisdvr4
Discussion starter
48 posts
·
Joined 2021
I dont have access to the points where they are damaged since it runs all the way up vertically so I cant just tape the not so damaged ones. I also think that splicing them individually would be difficult since they are all taped together and I would have to feed each wire through seperately.
12,816 posts
·
Joined 2016
I think most of the wires are 16-20ga, except the obvious big ones. If you use 16ga for all of them you should be fine. From the hip, if the outer diameter is about the same, you're ok, but take a peek at the size of the twisted wire inside the insulation, some wire has more or less insulation than another brand. Try to match up the size of the wire itself if possible, not the total diameter. Generally going larger gauge doesn't hurt anything, but going smaller can and will.
I'm a packrat, I have a box full of all kinds of colors and gauges of wire. It's nice not having to go to the hardware store.
I'm a packrat, I have a box full of all kinds of colors and gauges of wire. It's nice not having to go to the hardware store.
357 posts
·
Joined 2020
Sry to hear your issue.
I agree with advice. Step away for a bit while you needed supply order comes in. I would go wire by wire.
I would not close that area until things are good and tested. You could find the specific one for brake light and headlight, but I would inspect and fix obvious. Id do with the weather tight heat shrink crimps recommended above. I'd add good 3m electrical tape around everything, ONLY after confirming it works.
Once in mounting a mag flashlight holder clamp in a tractor cab, I drilled the AC evap line to the roof.
12,816 posts
·
Joined 2016
I see your dilemma. If you can identify the damaged wires, you could try to feed a wire bypassing them all the way from the top and splice it in at either end (removing/isolating the damaged wire). But, it looks like you'll be better off removing the paneling and insulation and spending some time disconnecting and feeding the harness back through enough to expose the damaged part so you can fix it. If you're planning on adding any other things like speakers or lights or something in the future, that would be a good time to run some wire and have it in there already, too. I used 18ga/7 piece Garden Sprinkler control wire as my own "ready to use" wire harness for future additions.
3,547 posts
·
Joined 2015
It sounds like you feel removing the harness to work on it is to much trouble and you want to just patch a bypass around the entire affected area. Let's say you do go that route. Are you thinking of leaving those damaged wires exposed inside the cavity, where they will be free to short out against each other and/or the metal of the van body?
Seriously, remove the wood you have installed, pull out the harness, crimp together the damaged wires using the crimps shown in post #9 and some heat shrink, cover it all in a wire cover of some sort to prevent further damage and put it back where it belongs. Also, given that the area you are drilling into appear to be "no-drill" zones, maybe you could put a vertical strip of wood attached at a few places, and then drill each piece into that instead of continuing to drill into an area that has wiring.
Seriously, remove the wood you have installed, pull out the harness, crimp together the damaged wires using the crimps shown in post #9 and some heat shrink, cover it all in a wire cover of some sort to prevent further damage and put it back where it belongs. Also, given that the area you are drilling into appear to be "no-drill" zones, maybe you could put a vertical strip of wood attached at a few places, and then drill each piece into that instead of continuing to drill into an area that has wiring.
11,113 posts
·
Joined 2016
I agree. Take the time and effort to do it right = do it once.
It is my understanding that if the connecters are the type with adhesive then shrink sleeve is not necessary.
It is my understanding that if the connecters are the type with adhesive then shrink sleeve is not necessary.
357 posts
·
Joined 2020
also if you have to add a aftermarket brake controller, you have to splice the lighting and brake wires so now might be time with a longer lead to hitch..
Also check rear camera, reverse lights and reverse proximity warning if you have it.
Also check rear camera, reverse lights and reverse proximity warning if you have it.
2,157 posts
·
Joined 2018
I recall seeing some CANBUS wires somewhere near there and remarking on it at some point. I think it's for the optional parking assist module.
Point being, there are lots of things that could be affected even though they don't seem to be in "the right place". The first thing I'd be doing is trying to see whether there is a connector on either side of the affected area that I can disconnect and test for continuity. Unless the assembly is entirely visible and accessible, I wouldn't even consider trying to fix this without a wiring diagram. There can be connectors where you don't expect, and wires can change color where there are connectors and splices.
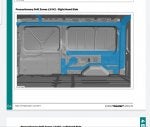
And, not to kick a person that's already down, but it really does serve as a good reminder that those areas marked in BLUE in the BEMM, labeled as "NO DRILL ZONE", should really be respected.
Point being, there are lots of things that could be affected even though they don't seem to be in "the right place". The first thing I'd be doing is trying to see whether there is a connector on either side of the affected area that I can disconnect and test for continuity. Unless the assembly is entirely visible and accessible, I wouldn't even consider trying to fix this without a wiring diagram. There can be connectors where you don't expect, and wires can change color where there are connectors and splices.
And, not to kick a person that's already down, but it really does serve as a good reminder that those areas marked in BLUE in the BEMM, labeled as "NO DRILL ZONE", should really be respected.
12,816 posts
·
Joined 2016
This is a good place to remind people about a wonderfully handy tool, a wireless borescope/endoscope. I picked one up for $30 at Hot August Nights. It has a built in battery, charged via USB, and has it's own wifi (not bluetooth) connection to whatever device you want to use. No need to plug it into a phone, tablet or computer. Mine is about 3/8" diameter and has an LED light. I've only used it a few times, mainly because I forget that I have it, but it's been invaluable each time.

11,113 posts
·
Joined 2016
I have no interest in the details.I've only used it a few times, mainly because I forget that I have it, but it's been invaluable each time.
View attachment 148297
12,816 posts
·
Joined 2016
You don't want to hear about mysteries solved behind drywall? Some Hardy Boy you are.

-
?
-
?
-
?
-
?
-
?
-
?
-
?
-
?
-
?
-
?
-
?
-
?
-
?
-
?
-
?
-
?
-
?
-
?
-
?
-
?
- posts
- 498K
- members
- 59K
- Since
- 2012
A forum community dedicated to Ford Transit owners and enthusiasts. Come join the discussion about performance, modifications, troubleshooting, storage capacity, maintenance, and more!


