Ford Transit USA Forum banner

Introducing Vanilla

34K views 43 replies 16 participants last post by  86scotty  
#1 · (Edited)
Well, I’m happy to say I’ve officially joined the club. I signed papers today on a very low mileage 2015.

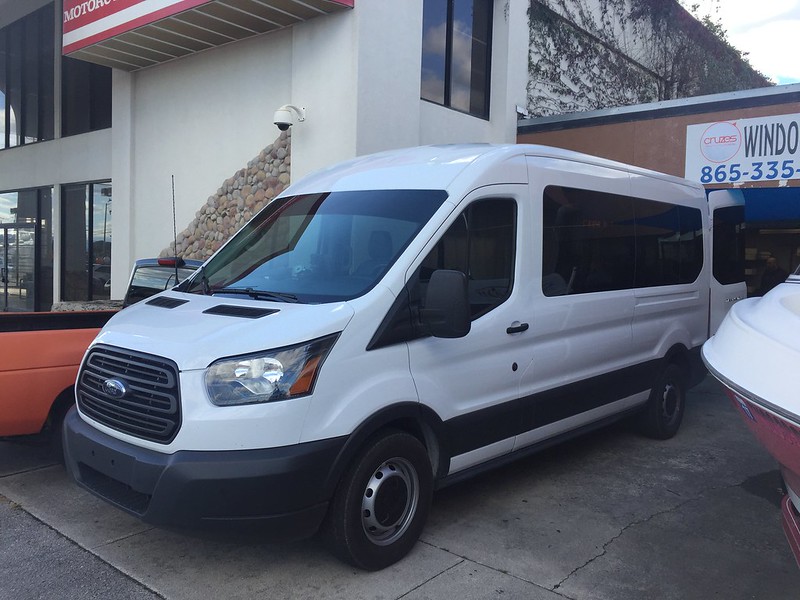
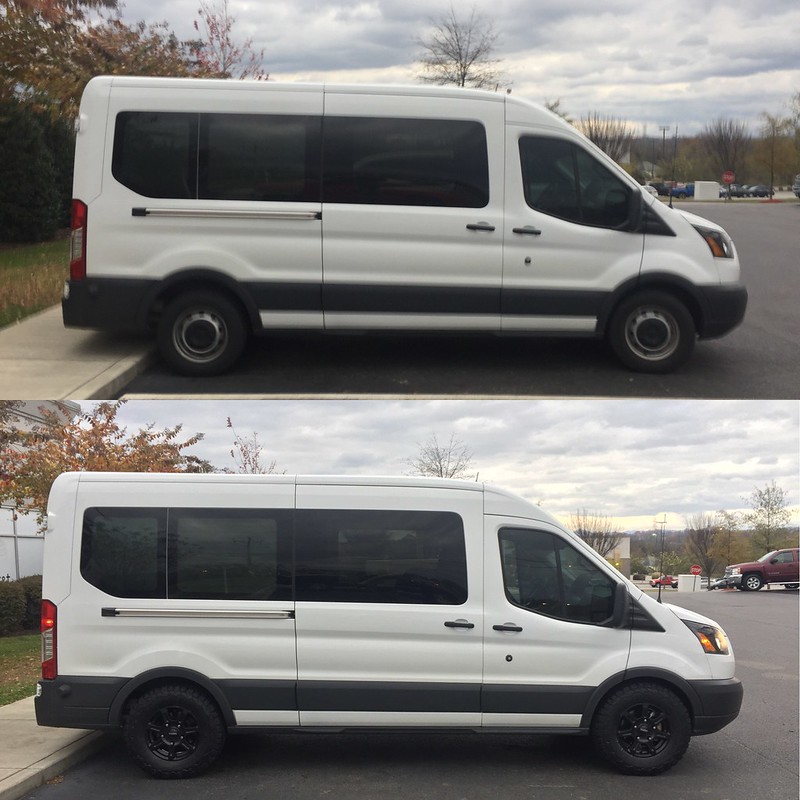
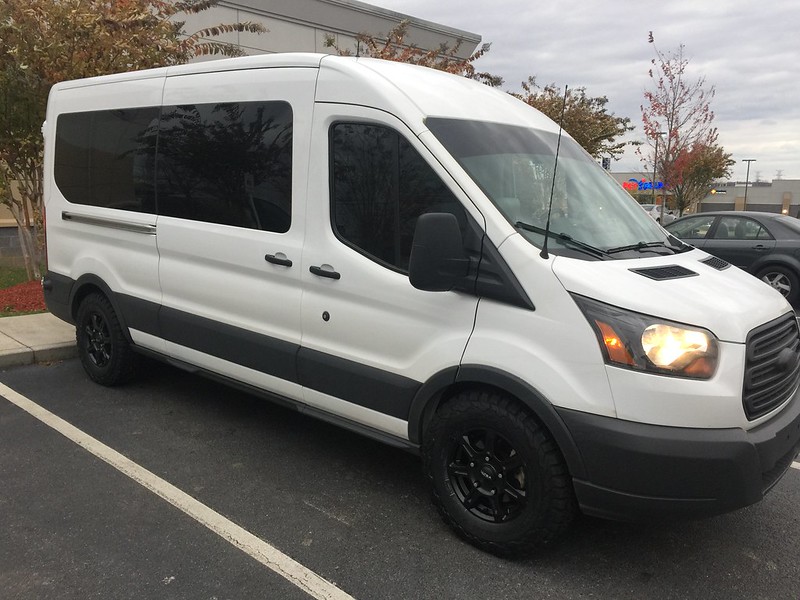
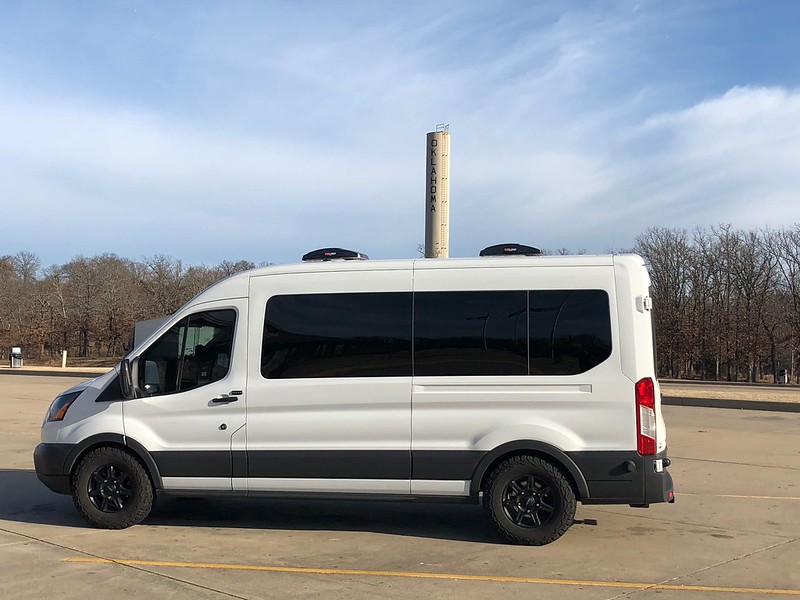
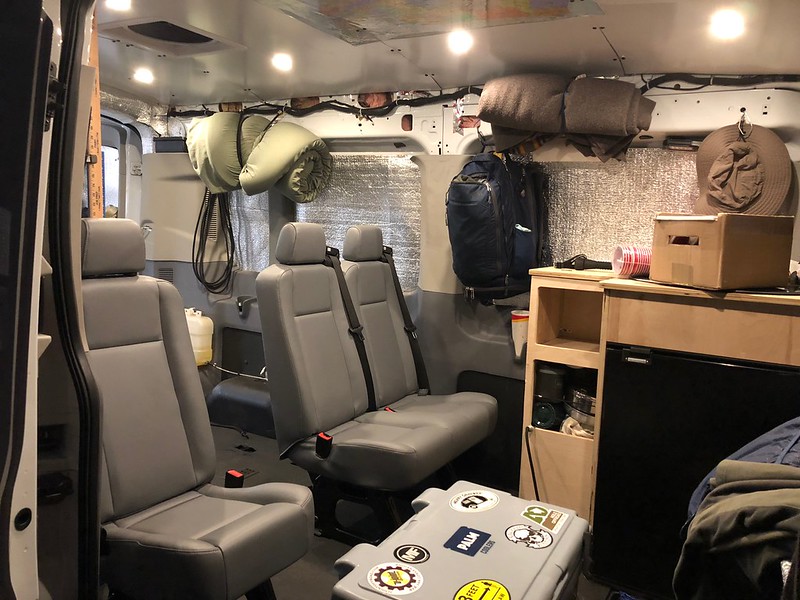
2015 mid roof 148” white T350 XLT wagon

Gray vinyl 12 passenger (though I feel ‘leatherette ‘ is a much better title given it’s far superiority over old school Ford vinyl)

Ecoboost 3.5 w/ 3:73 gearing

Black vinyl floor (Love this feature)

Steel wheels w/ black centers

Rear view camera but non Sync radio with Sirius (kinda strange I think)

29k miles

10/10 condition

I couldn’t be happier, just waiting on funds to clear seller’s account so I can take delivery

:D

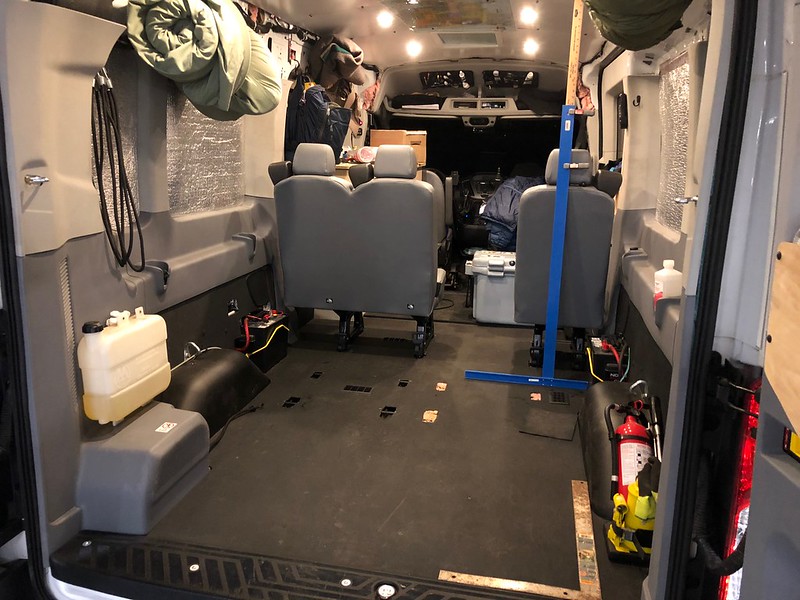
I'm adding a proposed floor plan to the first post here but will elaborate in future posts.

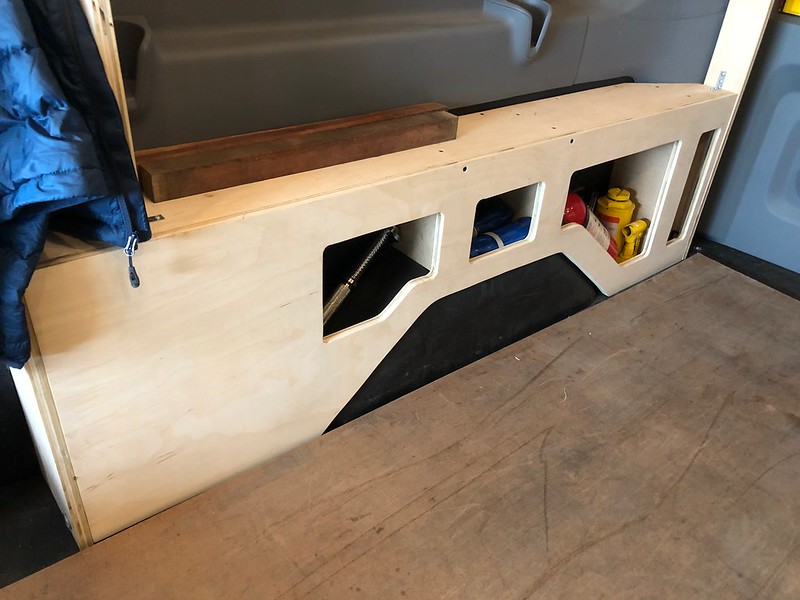
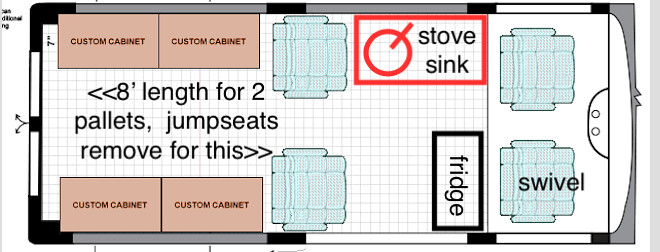
Transit EB lower 2017-10-08 at 7.24.10 PM by 86scotty, on Flickr

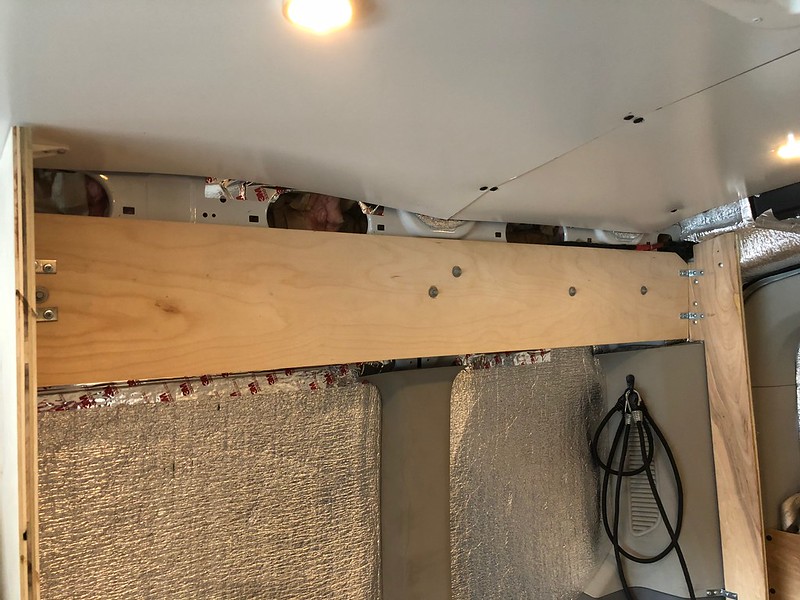
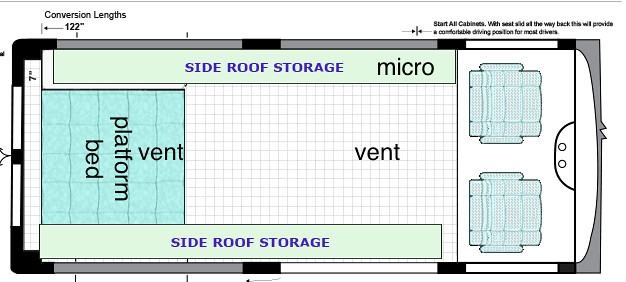
Transit EB upper 2017-10-08 at 7.27.36 PM by 86scotty, on Flickr

More info below

Sent from my iPhone using Tapatalk
 
#8 ·
Here's Vanilla next to my recently converted 4x4 Econoline. It's going to a new home tomorrow.

IMG_2975 by 86scotty, on Flickr

My first mod was window tint! The view inside the Transit passenger model is amazing and vision is amazing, but that's a LOT of clear glass. I had the rear windows tinted over the factory tint, windshield done with a strip of limo (5%) and the driver and passenger matched to the rest of the sides with 20%. It's much easier on me on sunny days now.

IMG_2977 by 86scotty, on Flickr

I'm gathering parts for my interior conversion but some simple things got done this week.

Red LED upper console mod:

http://www.fordtransitusaforum.com/electronics-audio-lighting/55338-red-led-console-mod.html

I pulled all but one two seater bench behind the driver for shuttling my kids around.

Also in: SMEV/Dometic 8621 stove/sink combo
Blue Sea 7610 battery isolator

Other than that I cut some Reflectix for privacy.

I think it's time for her first bath and a cold one (not the bath :D)
 
#4 ·
No pics except lousy ones from Craigslist. I'll post some up when I take delivery. For now, just imagine another white Transit.

It does in fact have the backup camera. The radio does in fact have Sirius and a number keypad (like a phone?) on the right side but I didn't have much time to play with it. It has the round thumb controls on the left side of the steering wheel only. Do those control the stereo?

Thanks. I'll elaborate on my plans for the van soon.
 
#6 ·
Gray vinyl 12 passenger (though I feel ‘leatherette ‘ is a much better title given it’s far superiority over old school Ford vinyl)
Considering how little leather there is in "leather seats" - and the fact that it's so heavily coated, it might as well be vinyl (says the lady who put seat covers over her "leather" seats, for coolness and comfort)

Congrats on the van!!
 
#7 ·
I'm getting in to expedite/hot shot work these days but want to set up this Transit as a multi-use adventure/work/utility vehicle. Work is the reason I chose white and didn't stick it out for a silver or dark gray one.

Hopefully the floor plan speaks mostly for itself but I should add a few things. I borrowed the templates from the Sportsmobile design studio and edited them with my lousy computer skills but the basics are hopefully obvious. The main thing that I couldn't represent is that the two captains chairs shown in the diagram are actually going to be the standard second row that comes in the transit, the split second row with a single jumpseat right inside the side door and the double seat on the left side. I plan run E or L track throughought the floor for tie downs and will modify these seats to be moved around as needed or completely removed based on load/work needs. I need to be able to haul 2 standard pallets (48x48x48ish) so the rear side storage cabinets will only be about 10' deep and probably about 3.5' high. The 2 platform bed sections I'm thinking (roughly 3x6' will be removable to be stood up out of the way and stored for larger loads/pallets in the rear.

In those side cabinets I will house 2 4d batteries, inverter/charger/electronics, fresh water tank I already have, perhaps a fold down or stow-away shower pan at some point, diesel furnace I already have and still have some storage for gear and work supplies.

Towards the front I will put an SMEV sink/stove combo for maximum efficiency and a fold up counter extension over the bottom of the bench seat on the left. 2 drawers and 2 cabinet doors will fit under hopefully. My fridge will be my big 70 liter Truckfridge chest fridge I already have and it can be moved around wherever based on need. Above sink/stove will be upper storage with a tiny microwave and cabinets going all the way down the driver's side to rear. On the passenger side I will have upper cabinets from slider back. I'm hoping to learn a bit about 8020 and do the upper cabinets in that. The galley cabinet will probably just be birch ply construction with a butcher block top.

300 watts of solar with 2 Maxxair vents on the roof, no rack per se, just a frame to mount the solar.

Swivel passenger seat only

3/4" barn stall mats in the rear with aluminum plates down low for pallet/cargo abuse.

This is a passenger van, which I wanted for rear air and to look less like a commercial vehicle. Rear inside windows are already tinted and will be covered with Reflectix. Rear and slider will be limo tinted with Reflectix when parked. Window shades, possibly roll down, on galley windows. I also hope to make a quick-deploy front privacy curtain on aluminum track for the windshield and front windows. Obstacles for upper cabinets in the passenger van are getting around/removing the side curtain airbags and rerouting some ducting.

Outside the van will be pretty much stock except I will add an awning, solar and roof vents. Oh, also planning on Ultra Toils with some better looking and bigger all-terrain rubber.

Comments/suggestions welcome!
 
#9 ·
My nephew does tinting, and I want that nice "brow strip" like yours; but I'll have to go a little more "invisible" on the side windows due to Michigan laws. It feels like I'm driving a solarium on a sunny day. And as other have mentioned, the A/C isn't exactly the freeze machine that the E-series had. Tint will be your friend.
 
#11 ·
Next on the list. The Nimbus 2017 (dark cargo with slider and rear door window) has privacy glass which is useless -- I can stand 30' away and look through the rear windows and out of the windshield. $400 I should not have spent .... Oh, well.

And it is a greenhouse, so I am investigating films that will block heat -- especially through the windshield. And add privacy in the van windows.
 
#13 ·
Wheels and Tires have been added!

At the time of this post my van is NOT lifted, stock height. I replaced the original wheels/tires at 50k with Ultra Toil 16" wheels with BFG KO2 245/75-16 E-rated tires. The wheels are the only offset Ultra wheel offers. Here are pics of the fit in the wheel well at stock height

Rear (van mostly empty)

Untitled by 86scotty, on Flickr

Front (no trimming required, no rubbing)

Untitled by 86scotty, on Flickr

Side views to show offset

Untitled by 86scotty, on Flickr

Untitled by 86scotty, on Flickr

space between tire and strut on front, about 1-1.5" inches

Untitled by 86scotty, on Flickr
 
#41 ·
Would you do Ultra Toil 16" wheels again?


Nice rig 86. Would you do Ultra Toil 16" wheels again? Where did you get them?

The Ultra Wheel fitment lookup says "Sorry, we do not have wheels that fit your vehicle." when I select 2018 Ford Transit-350 Base (https://www.ultrawheel.com/wheels/). Hmmm.

I'm want to upgrade to BFG KO2 245/75R-16 E tires, and upgrade the wheels as well. I wish I could find bead lock wheels for the Transit, but I've had no lock finding anything.
 
#14 ·
Further away pics. I've put a couple thousand miles on these now and they don not rub under any circumstances. No trimming has been done.

Vanilla by 86scotty, on Flickr

Vanilla by 86scotty, on Flickr
 
#17 ·
Another small mod was mounting my flashlight and camping hatchet. This one is a multi-tool with flint and tree saw included.

I used Quick-fists from Amazon.

Vanilla by 86scotty, on Flickr

Vanilla by 86scotty, on Flickr
 
#18 ·
Kitchen cabinet has been installed. I used a Dometic 8821 sink/stove (hob) with a 7 gallon Aquatainer under the cabinet. In it I mounted a GoWesty submersible water pump and Westfalia (Shurflo) cold water faucet. The fridge is a Truckfridge T130.
The unusual layout of the cabinet is so I can get two 4x4' pallets of freight in the van for work. Over the holidays I plan to pull it back apart and stain it and add T-molding around the cabinet and table, and future cabinets. Also, I need build a proper drawer and doors for the cabinet. Anyway, progress is slowly being made.

First cup brewed on the stove:

Vanilla by 86scotty, on Flickr

Vanilla by 86scotty, on Flickr

Here's a glimpse of what the finished product will look like. This is the cabinet I did in my old Sportsmobile. I really like birch cabinets with black T-molding.

http://www.sportsmobileforum.com/forums/members/3846-albums500-picture22187.html

http://www.sportsmobileforum.com/forums/members/3846-albums500-picture22192.html
 
#19 ·
Not exactly novel but noteworthy. I have my windows very dark, limo over the factory tint, and I usually keep Reflectix over that so I don't use them for vision. Until I get my cabinets built I'm REALLY short of storage but this is easily found storage anyway.

This is just scrap 1/4" underlayment I had around and will be replaced with stained birch to match the rest of my cabinets when I get to it.

Untitled by 86scotty, on Flickr

Untitled by 86scotty, on Flickr

Untitled by 86scotty, on Flickr
 
#21 ·
Not exactly novel but noteworthy. I have my windows very dark, limo over the factory tint, and I usually keep Reflectix over that so I don't use them for vision. Until I get my cabinets built I'm REALLY short of storage but this is easily found storage anyway.


This is just scrap 1/4" underlayment I had around and will be replaced with stained birch to match the rest of my cabinets when I get to it.


Very clever!


Sent from my iPad using Tapatalk

PS -

Yes, I really should create a build thread on this forum. I owe you guys this much given you’ve collectively been so informative, helpful and inspirational!

In the mean time, feel free to follow me on Instagram - https://linktr.ee/wandering_bison
 
#20 ·
Great idea...But I'd be afraid of losing things in there as I overstuffed them with things I "needed" handy ;-p
 
#22 ·
I've had a productive few weeks. Back to the build...

I tried for months to get my rear cabinet done but kept getting held up by the crap that needed doing first, a ceiling for instance. Got that done finally and got both roof vents mounted since I have no other opening windows. I set one to draw in and one to exhaust. Works well so far.

Untitled by 86scotty, on Flickr

Untitled by 86scotty, on Flickr

Untitled by 86scotty, on Flickr

With that I was finally ready for my rear cabinets. I have the van set up for work or play so the quick release seat tracks are still there for the middle seats. My galley and rear cabinet design required lots of compromises to make these seats work. Here are the seats in place:

Untitled by 86scotty, on Flickr

Untitled by 86scotty, on Flickr

As I think I've stated before I have to haul 48x48" pallets regularly so I need the space from wheel well to wheel well open. So how to do this and still have some storage? Not easy but easier with a square high roof van. I started by building some low boxes to enclose my batteries and still provide access to tie down points and give me some storage nooks. Here's the passenger side one:

Untitled by 86scotty, on Flickr

Also, the Transit has threaded holes everywhere! There are plenty along the upper sides above the windows where ac ducts and curtain airbags used to be. I was able to use these to rigidly mount my cabinet backs and then just build the cabinets off of them.

Untitled by 86scotty, on Flickr

From there it was just a slow process of cutting templates out of thin material for the cabinet sides to hug the van walls and window recesses, and then to figure out where I needed shelves to fit my junk.

Untitled by 86scotty, on Flickr

Untitled by 86scotty, on Flickr

Untitled by 86scotty, on Flickr
 
#23 ·
So, my rear cabinets and bed platform HAVE to fit behind those seats. No way around it. This van is big but they're never big enough. Another goal I had was to have rigid and versatile tie down points with an adjustable bed platform. I might need my bed stored all the way at the ceiling or just high enough to clear any load I might be carrying. I settled on E-track over my first idea of L-track since I already have lots of E-track straps etc. and it's much cheaper. The end result was that I have a nice 48" wide bed but from seatback to rear doors it's only 63" long. I'm 6'2" or 74" but I'm alone in the van almost always so I just sleep at an angle and can stretch out fine.

I seem to have set the camera down for the rest of the cabinet build until almost done but here's the idea. 1/4" birch sliding doors on tracks from Mcmaster. 1250 watt Tripplite inverter run to 4 outlets throughout the van. One outlet hidden in closet with power strip for small appliances and chargers. Bed platform infinitely adjustable made of 2x4's and 3/4" ply. E-track run 8 ways from Sunday to anchor about anything and all this behind the middle 3 bench seats. 4" firm foam for bed and ply and foam are split (each 2' wide) for ease of setup/breakdown/storage.

Keep in mind none of this is finished. It will all come back apart in pieces for molding and stain.

Untitled by 86scotty, on Flickr

Untitled by 86scotty, on Flickr

Untitled by 86scotty, on Flickr

Microwave and printer in closet, lower shelf for tools, cordless power tools and chargers

Untitled by 86scotty, on Flickr

Notice the bed platform stored at it's highest in the above pics. Also, outlet by rear door. There are two more outlets where needed, on the front of the passenger side cabinet just inside slider door and on the face of the galley cabinet above fridge.

Here she is having swallowed up a 48x48x24" pallet of aerospace parts, 2000 lbs. worth:

Untitled by 86scotty, on Flickr
 
#29 ·
Yeah, I had it left over from another overlandy build I did and I decided to mount it. I do camp out of the van pretty often and a shovel is good to have around.

E-track has spring loaded release tabs on every attachment. The bed is easy to raise and lower for me but you do have to juggle a big. I lift each end of the bed up with one hand by lifting the whole 2x4 with platform and mattress on it and release the clips with the other hand moving the mounts where I need them, then drop the whole thing back in to place.

It is VERY strong. No movement at all and I overbuilt it to handle lashing straps for heavy freight. Not sure how it would fare in an impact but I did my best. Hopefully I'll never find out. I've steered clear of E-track and L-track before but it's usefulness even in a camp only van is undeniable.

Thanks everyone. I'm hoping to finish my forward upper cabinets tomorrow. Pics to follow.
 
#30 ·
Nicely done...love the clean functional design and clever use of space...still trying to visualize how you lift/juggle the bed up but love the concept.