Thanks for the comments folks! This build has taken way longer than I thought it would due to various life intrusions as well as feature creep but it's getting so close to be fully buttoned up.
After a fair bit of foot dragging, I ended up pulling the trigger on some Rolef bug screens. We'd always planned to do bug screens but weren't sure we wanted to pay the price for Rolef. Thought about making my own but at this point in the process I'm willing to throw some money at a turn-key option to both save time as well as mental sanity. Didn't quite like the cheapness of the Amazon offerings so it came down to Rolef and "The Bug Wall".
Products - Rolef Canada
Ford Transit Insect Screens for your Van Conversion – The Bug Wall
The bug wall is a little more affordable and it might the better option for folks that have covered their metal van frames w/ auto upholstery since it's held in place by the door gasket rather than velcro strips and self-tapping screws like the Rolef offering. That said, I ended up going w/ Rolef because I really liked the build quality, the additional details, and the fact that the screens were 100% custom. I simply provided them measurements and pictures (and money) and they provided screens that were guaranteed to not interfere with my layout (access to switches, to my drop-down table, etc).
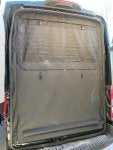
Install went pretty smoothly though I did need to remove some cabinets and panels to get access to the van frame to ensure things got installed in the best way possible. For the rear of the van where I've covered the exposed metal with auto upholstery, the supplied velcro mounting tape obviously did not work so I wound up using a combination of self-taping screws and neodymium magnets to secure the screen. Works super well.
View attachment 167686
Have some fabric snaps that I'm going to mount to the screen to keep it tight to the cabinet as I don't like the look of a velcro strip being stuck to it.
View attachment 167687
View attachment 167688
View attachment 167690
Rear has a privacy screen that can be put up/down from inside. The whole screen can also be unzipped from inside as well.
View attachment 167694
View attachment 167691
Still need to install a wood panel to finish off the rear bed platform...
View attachment 167692


")